


- November 12, 2020
- Explore Facebook Solutions and Insights
Last year Facebook introduced the new App Review process to ensure the best possible Facebook experience for your app’s audience. Facebook said — “Before you can switch your app to Live mode, we may need to make sure that you will be using our products and data in an approved manner. To achieve this goal, we require many apps to undergo App Review”.
The process would not be so complex and scary if you gain little knowledge before starting this process. Thus, we — Kevit.io would like to share our experiences and describe how you can get your app approved.
Here are all of the possible steps:
- App Review
- Product Review
- Business Verification or Individual Verification
- Supplemental Terms
- Tech Provider Amendment
- End-Business Verification
You will likely have to complete some combination of these steps. I’ll explain how. The exact combination depends on the products and features you are implementing, the type of data you are accessing, and how you will use that data.
So the first question that arrives in your mind must be — When to submit your app for the Review?
Well, you can begin the review process at any time, and you can edit your submission before it is reviewed, but we recommend that you begin a submission only after you have thoroughly tested your app in development mode and you are ready for release.
Note that If your app has already gone through App Review and has been approved for specific products, and if your app is in Live mode and now you want to add new permissions, features, or products, you can go through Facebook’s App Review for Live Apps guidelines which will help with submission. In this case, you need to go through the review process again.
But when you are going to pass through this process for the first time, let’s get started with the first step –
Process:
1. Configure Your App Settings
To configure your app — https://developers.facebook.com/apps/ go to this link and Select your app you want to get reviewed. After that, you will get a page like below 👇

- Now you need to click the left side menu Setting.
- Settings –
1. Basic
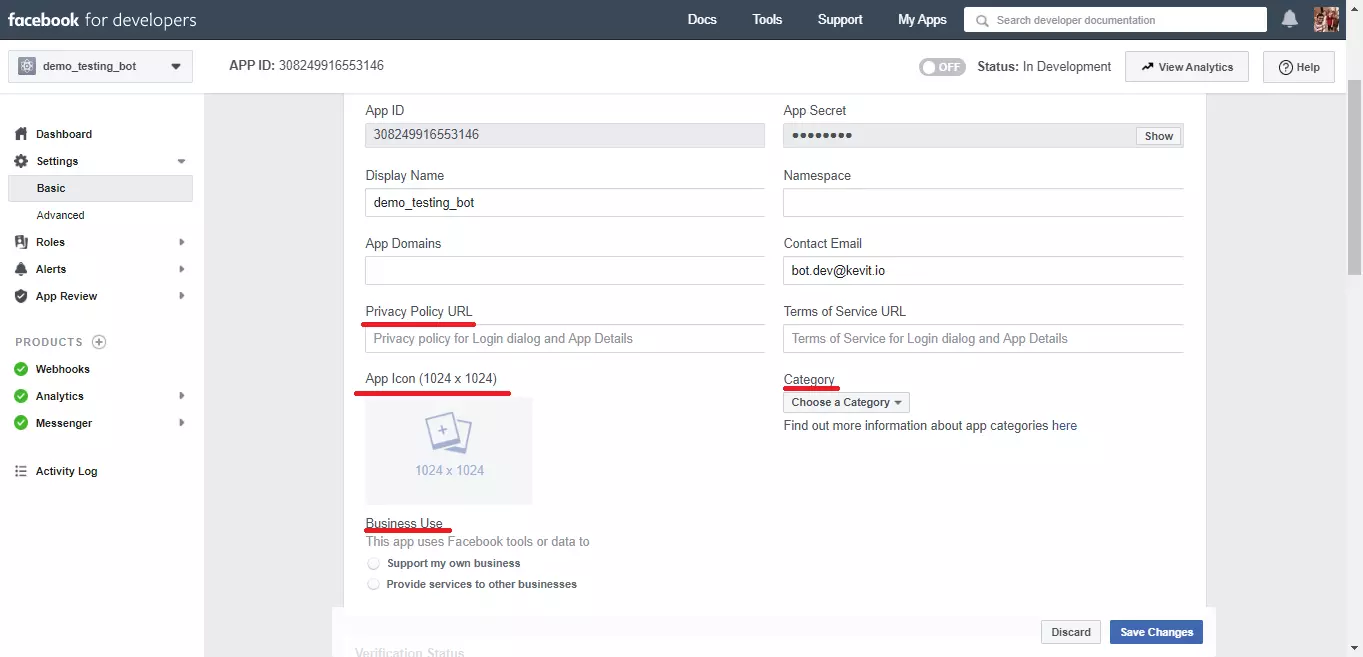
2. Advanced - At a minimum, you need to provide the “basic” information in the app console under Settings > Basic:
1. App Icon
2. Privacy Policy URL
3. Category
4. Business Use - Highlighted fields need to fill in Snapshot.
- Then click on “Save changes”. You can edit these details later if you want.
2. Allow Users to Message Your Page
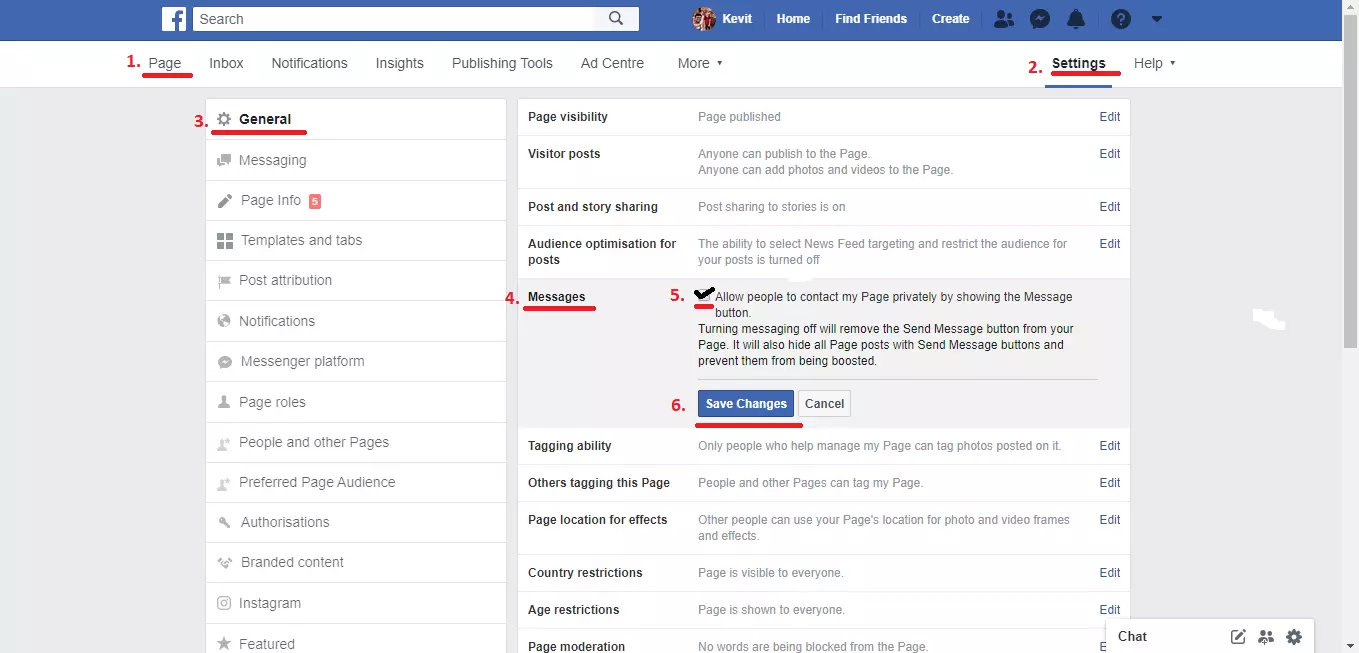
- To receive messages from users, you must enable messaging from your Facebook Page. To make this happen, Go to your Facebook do the following –
- Go to Page
- Page Setting
- Settings > General.
- In the ‘Messages’ section, click the ‘Edit’ button.
- Select the ‘Allow people to contact my Page privately by showing the Message button’ checkbox.
- Click ‘Save Changes’
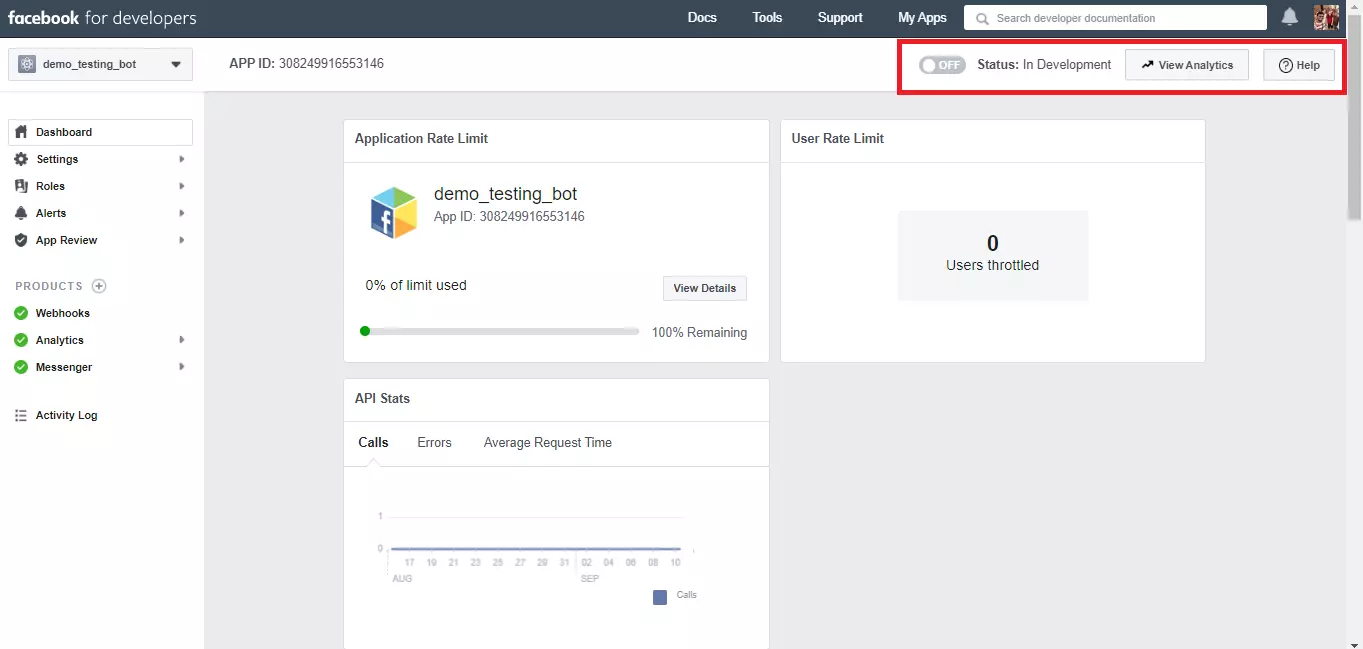
3. Put Your Bot in Development Mode
Now that you are ready, you have to make sure that your bot is set to development mode, not in a Live mode — As given in below images 👇
[ You don’t have to do anything in this step. If you are doing this process with that app for the first time, your app will be by default in Development mode unless you make it Live. ]
4. Select app permissions
- Now we need to Add permission. Go to the “Messenger” option on your left side, click on that and you will find “Setting”.
- Go to the setting page and now you need to scroll a little. You will find the “App Review for Messenger” section.
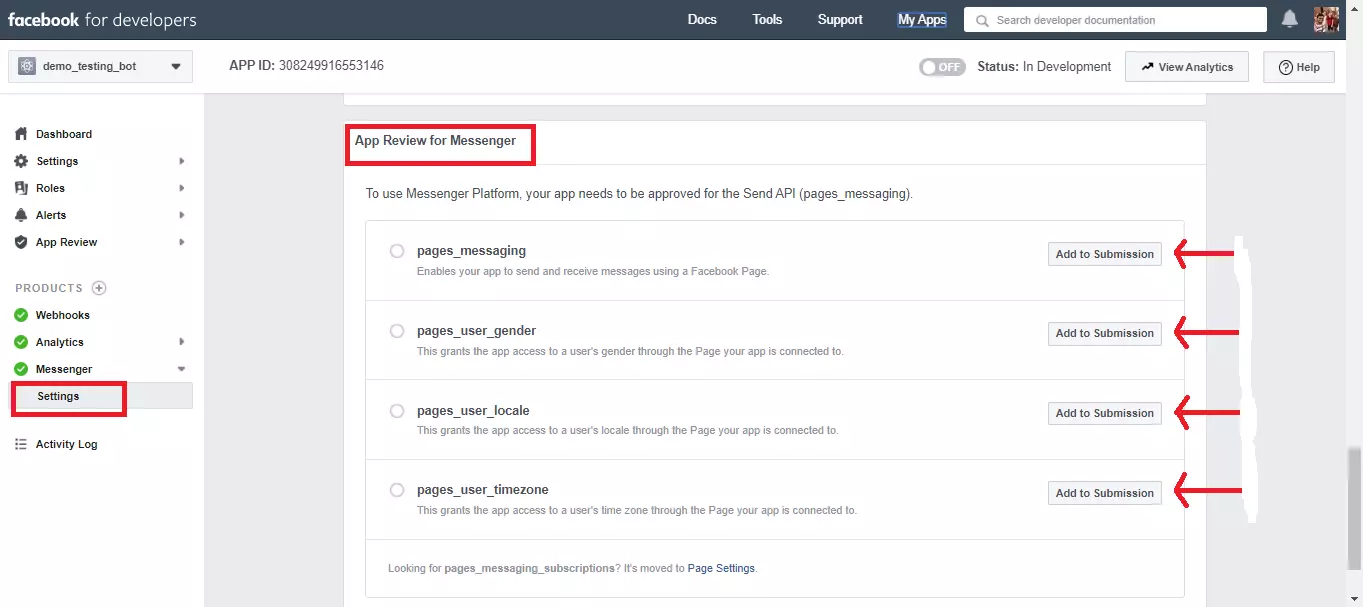
- Click the ‘Add to Submission’ button for each permission your bot requires. Added permissions will appear in the ‘Current Submission’ section right below the “App Review for Messenger” section.
- During the review process, the Facebook team will test your bot to ensure each of these permissions is needed, and that your bot complies with any related messaging policies. At a minimum, you should request the pages_messaging permission, which allows your bot to send messages.
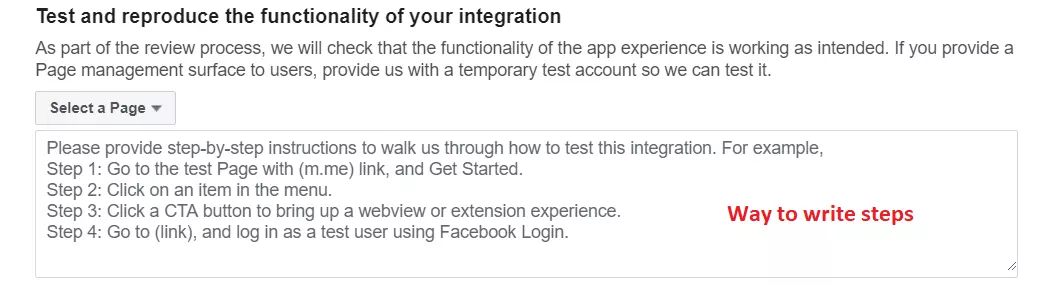
5. Test and reproduce the functionality of your integration
- As part of the review process, Facebook will check that the functionality of the app experience is working as intended.
- To check that, Facebook will need a Test User Id and credentials, which we need to create for the Fb review team so the Fb team can check/Test bot, then we have to send that credentials to them. How? I’ll help you.
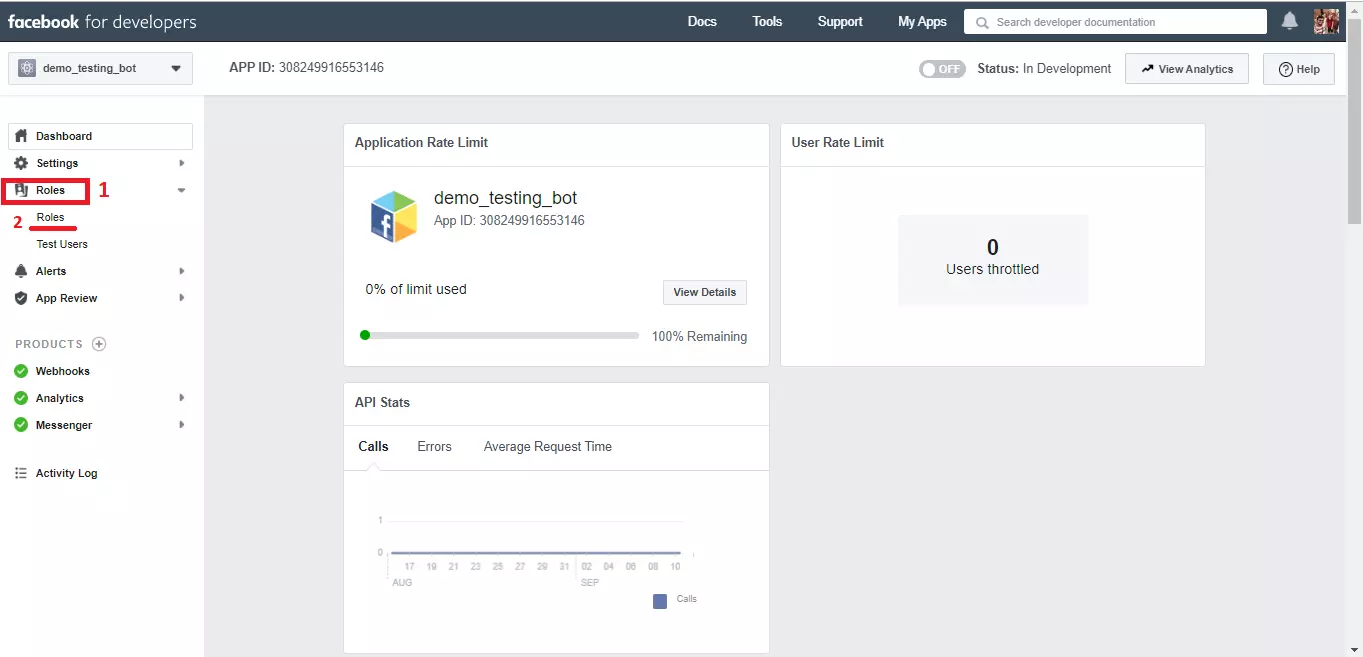
- Go to the left side menu and click on “Role”. Select the 2nd option — Test User.
- Now click on the add button.
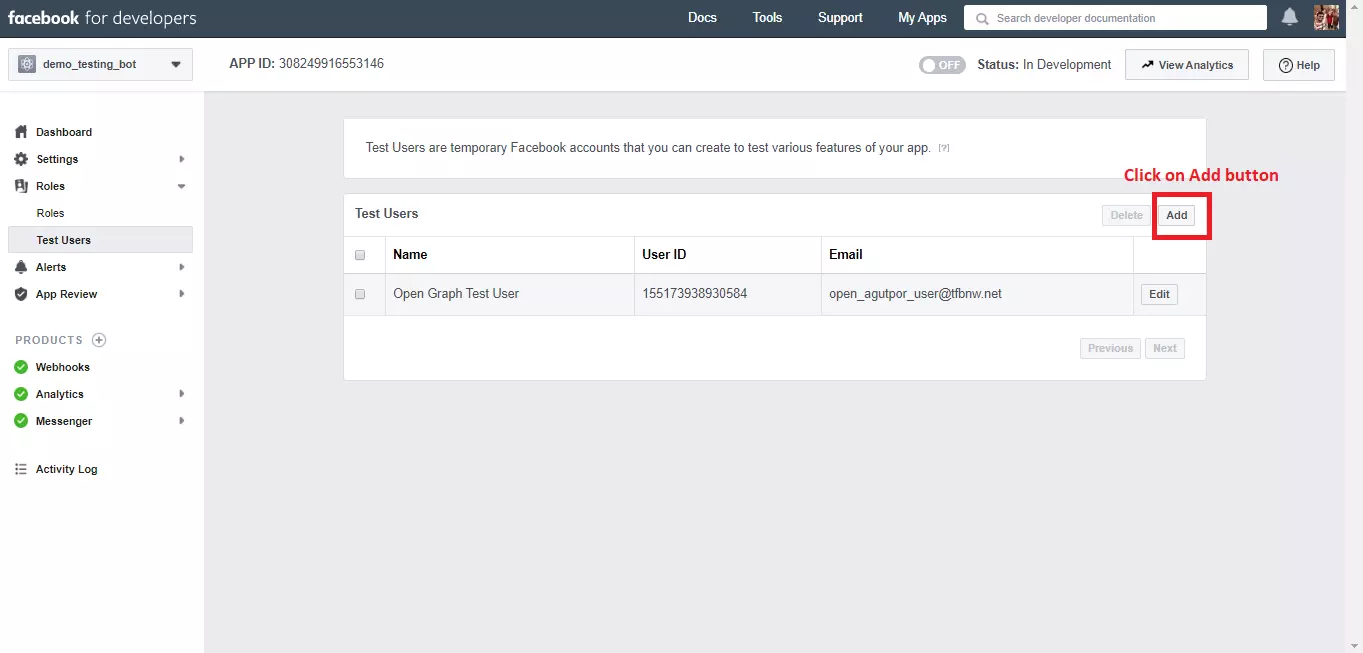
- You get the following window:
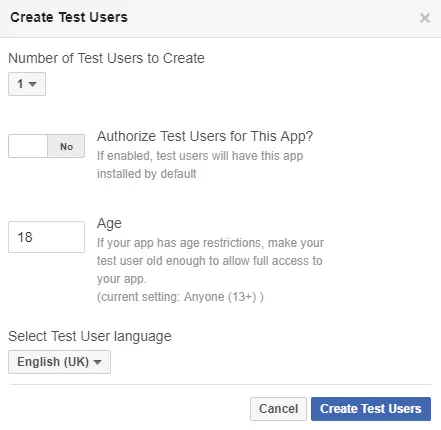
- Number of Test Users to Create: determines how many individual test user accounts are created. If you want to create more in bulk, you should use the Graph API instead.
- Authorize Test Users for This App: determines whether each newly created test account will have the app installed, the API version, and the Login Permissions granted.
- Under 18: determines whether the accounts will have age under 18 years old, which is useful for testing demographic restrictions. You can still change this age later manually by logging into the test account
- When you successfully create the Test User, you will get to see this:
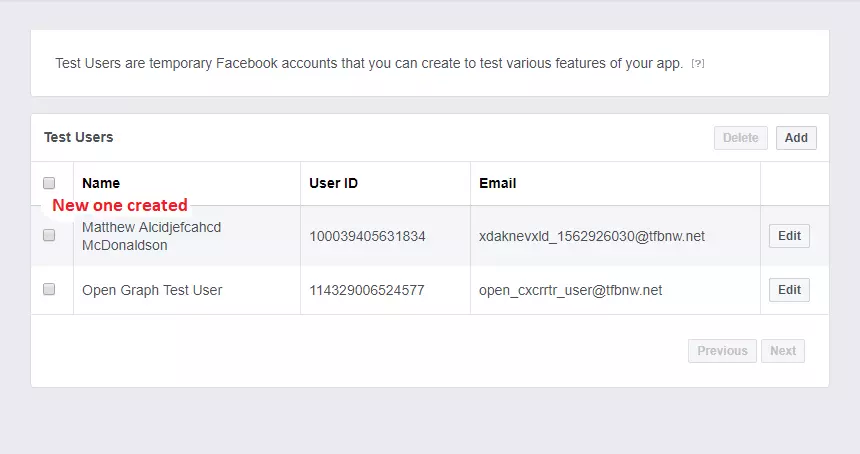
- Now click on Edit:
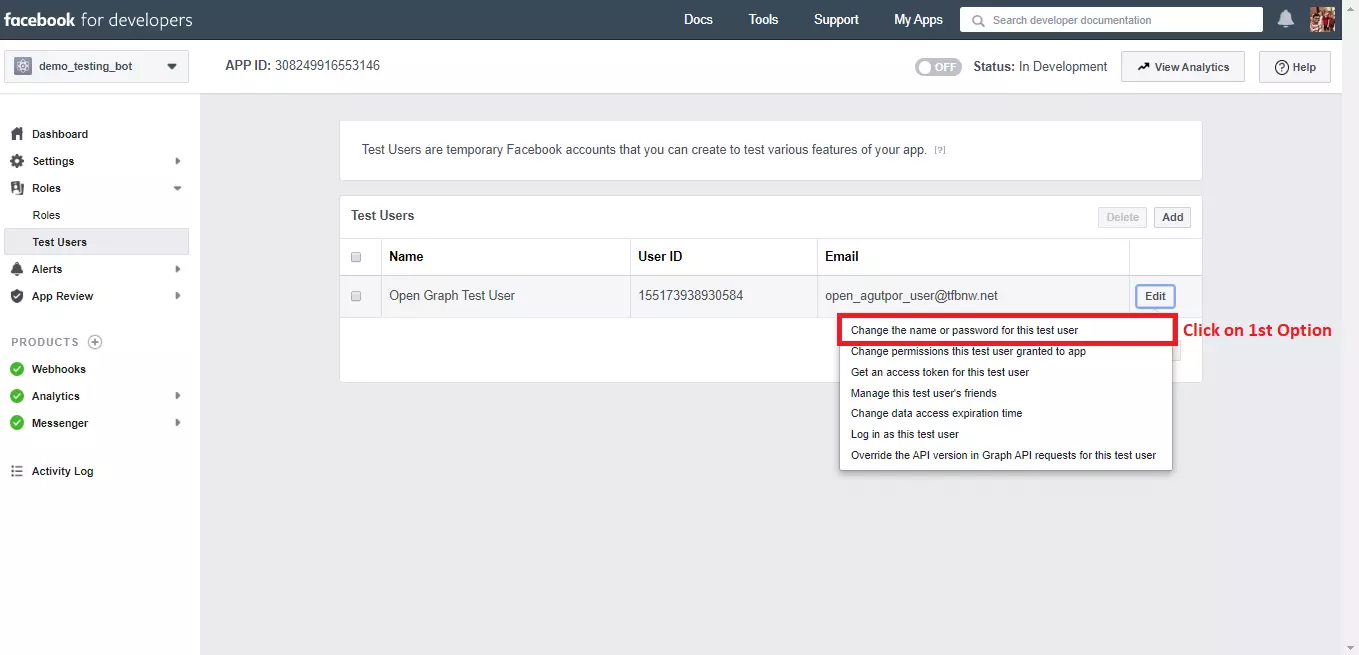
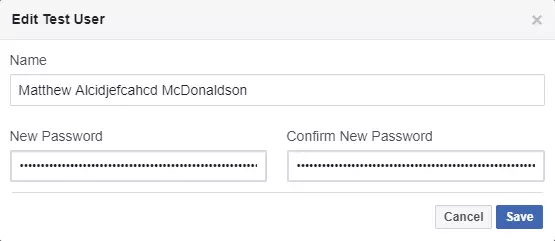
- Add the New password and click on save.
- After you finish all steps, you will get one password and email id for a test role.
6. You have test users now need to create the test page
- After creating the Test User, now you will have to create a Test Page. Let’s begin.
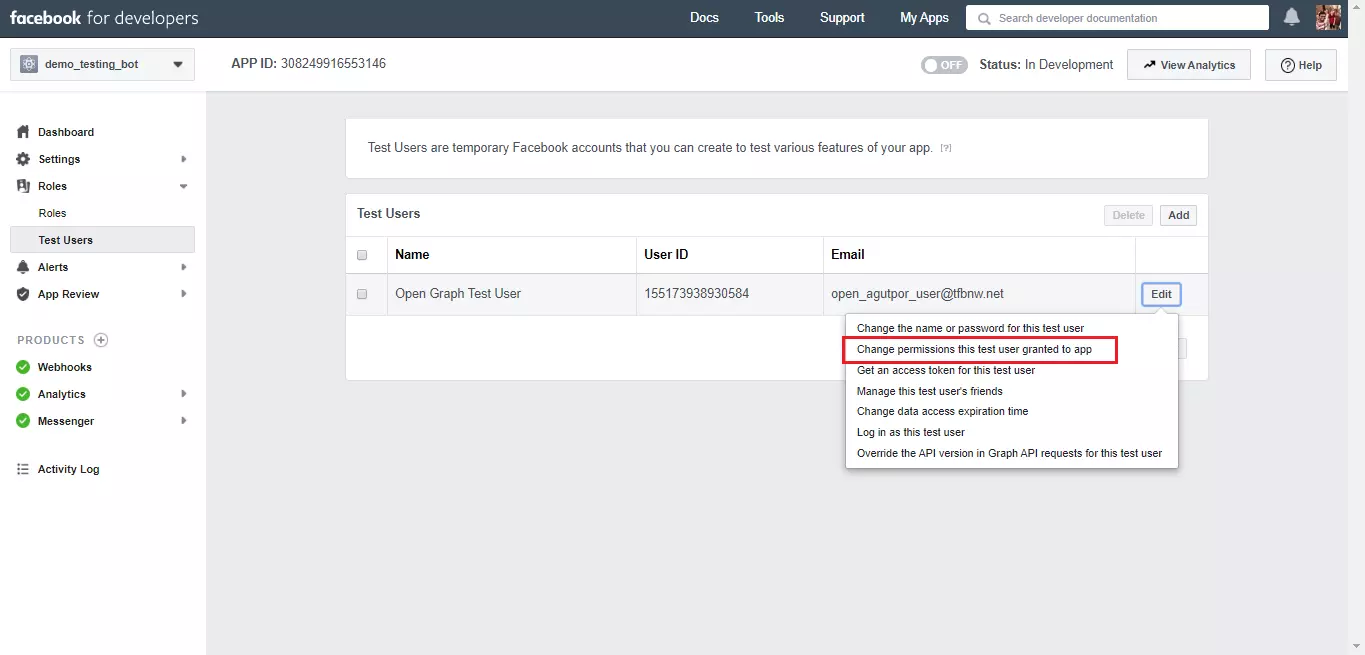
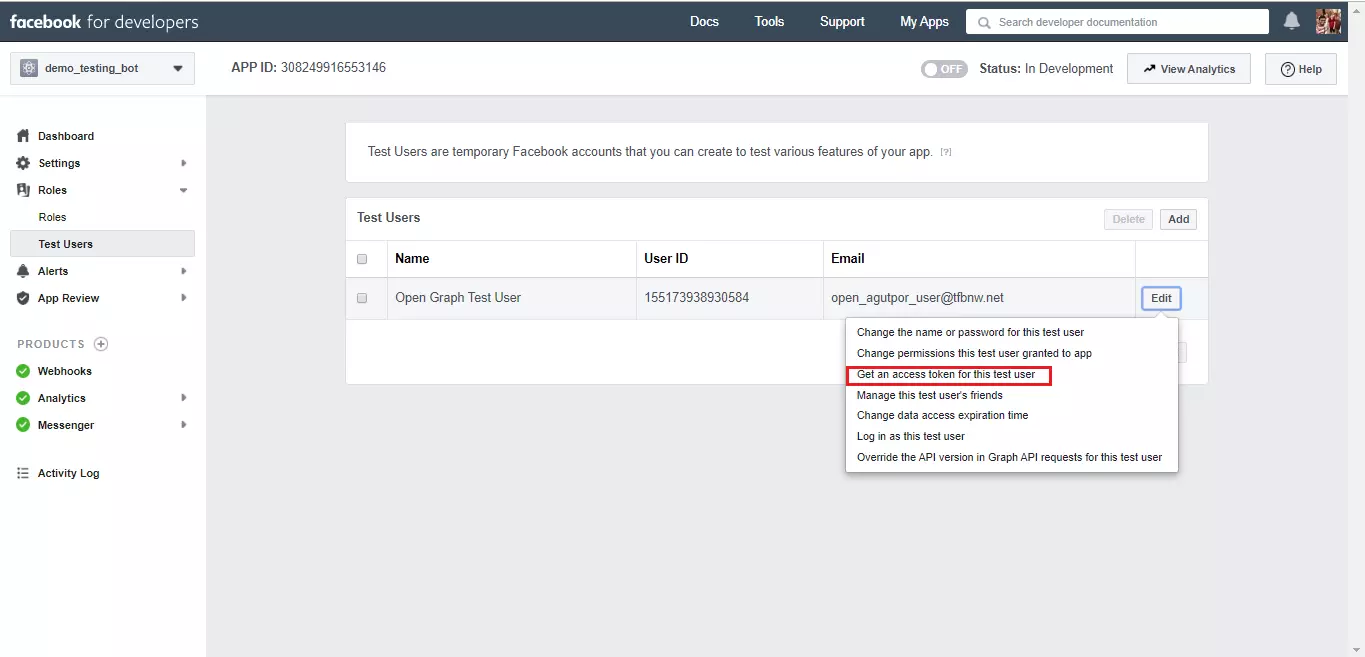
- On the same page where you have created the Test User, click again on the Edit button and choose the 2nd option, like shown in the image.
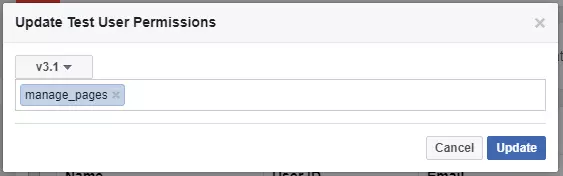
- Click Change permissions this test user granted to the app to ensure the manage_page permission has been applied. If you can’t find that permission you just have to simply type and select manage_page permission. Then click on the “Update”.
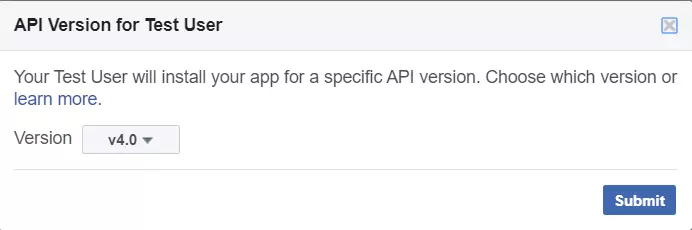
- Now on the same page, you need to select the 3rd option this time:
- When you’ll click on the 3rd option, you will get a message box like this:
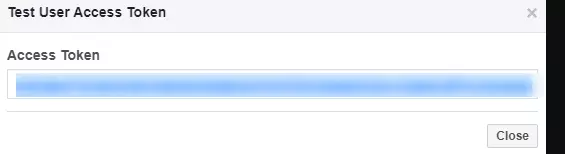
- Now you just need to click on the “Submit” button. And you will get an Access Token which you need to copy:
- Go to the Graph API Explorer. Paste in the user Access Token you copied. Set the action to POST and enter the path like /[TEST_USER_ID_HERE]/accounts then enter fields corresponding to the following parameters (feel free to change the values):
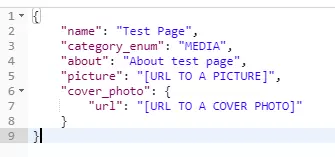

Once that completes, it will return the new Test Page’s ID.
- You get the page id now you need to Page access token to get the page access token simply make API call.
- With the following required field:
URL: https://graph.facebook.com/oauth/access_token
Method: GET
PARAMS:
- Grant_type:-fb_exchange_token
- client_id:-App Id
- client_secret:-App secret
- Fb_exchange_token: test user access token
Make GET call you to get the
{
“access_token”: “HERE ACCESS TOKEN”,
“token_type”: “bearer”,
“expires_in”: 518266
}
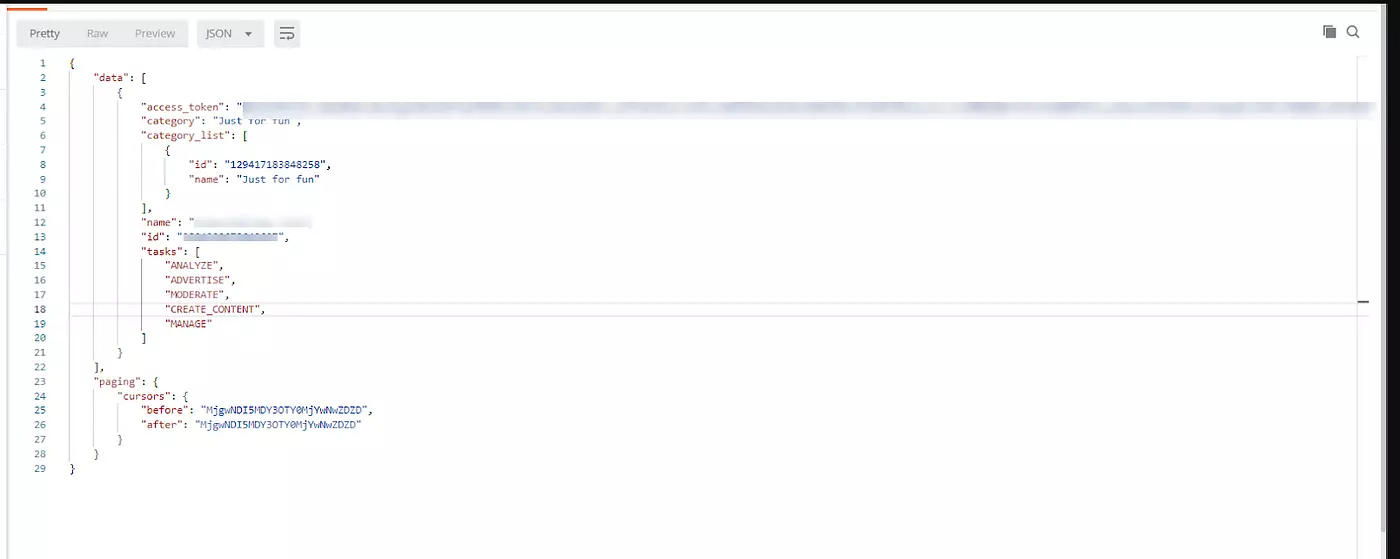
Now you need to Get page access token
- Method: Get
- URl:https://graph.facebook.com/me/accounts
- Params
- Access_token:- User Access Token
Make a Get call
7. Connect Facebook app and Page
Now Next step is connected your Facebook app to Page.
So you need to make a one API call for that
- Method: Post
- URI:-graph.facebook.com/v4.0/{page-id}/subscribed_apps
- Params
- subscribed_fields:[Permission LIst]
- Acces_token: -Page access token
Make an API call then submit you got success response
Refer — –https://developers.facebook.com/docs/graph-api/reference/page/subscribed_apps/
- Now you have a one-page access token and page id
8. Connect App with Service Providers
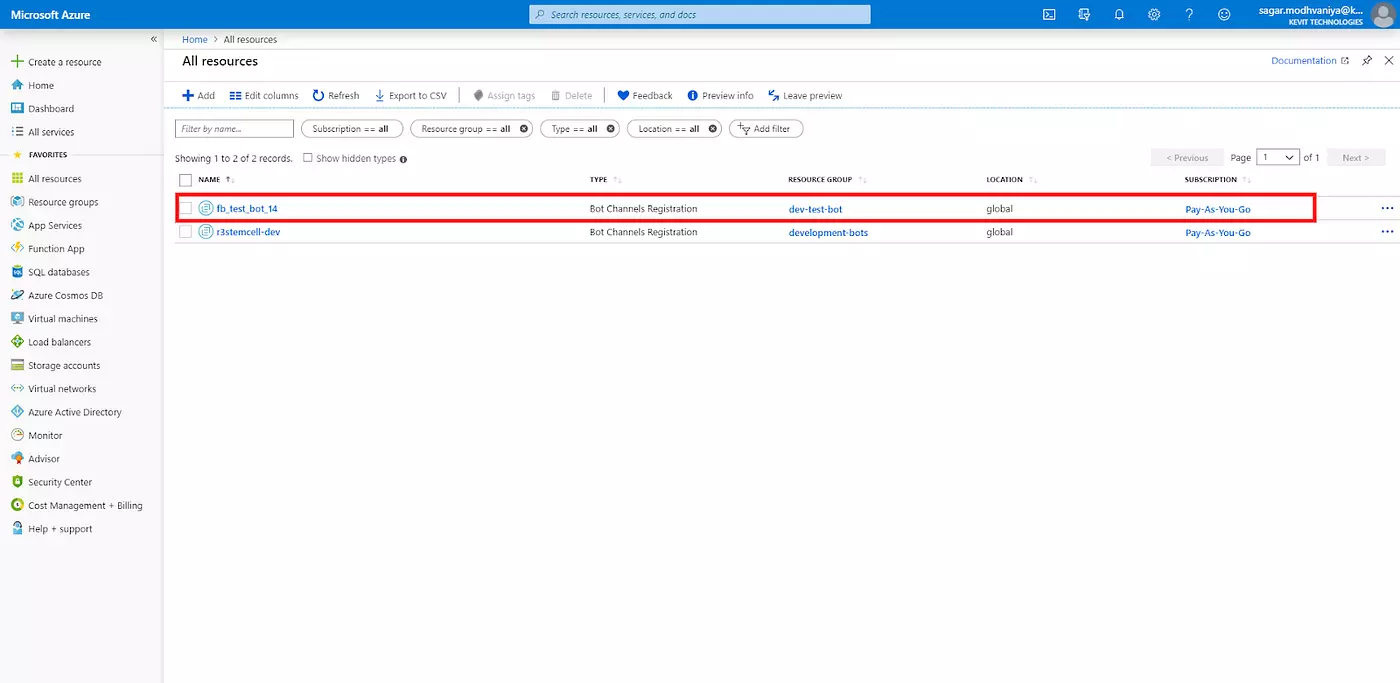
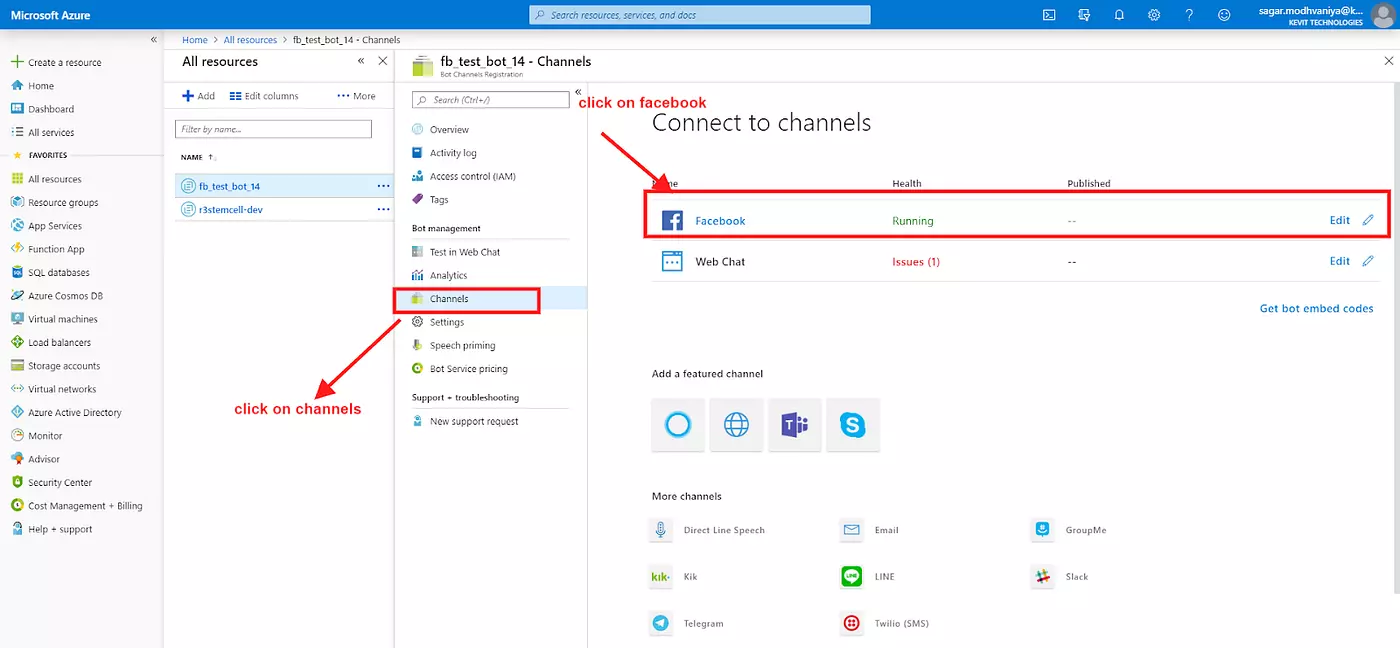
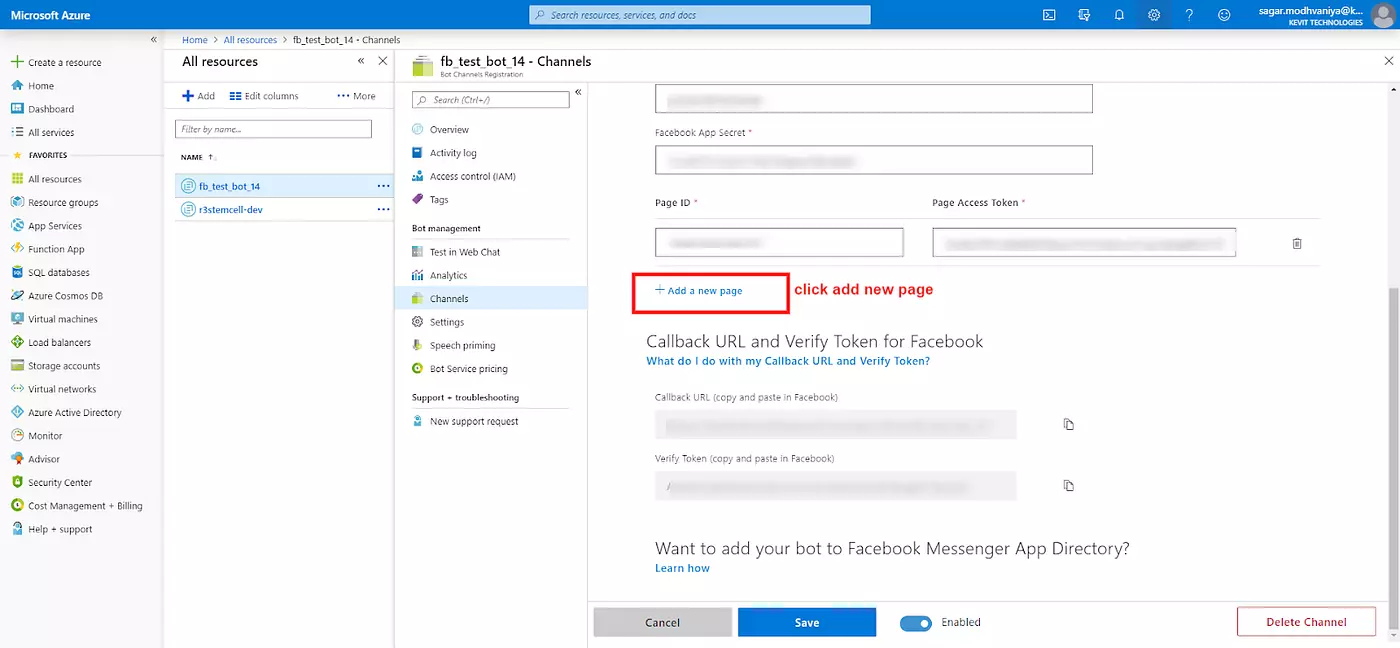
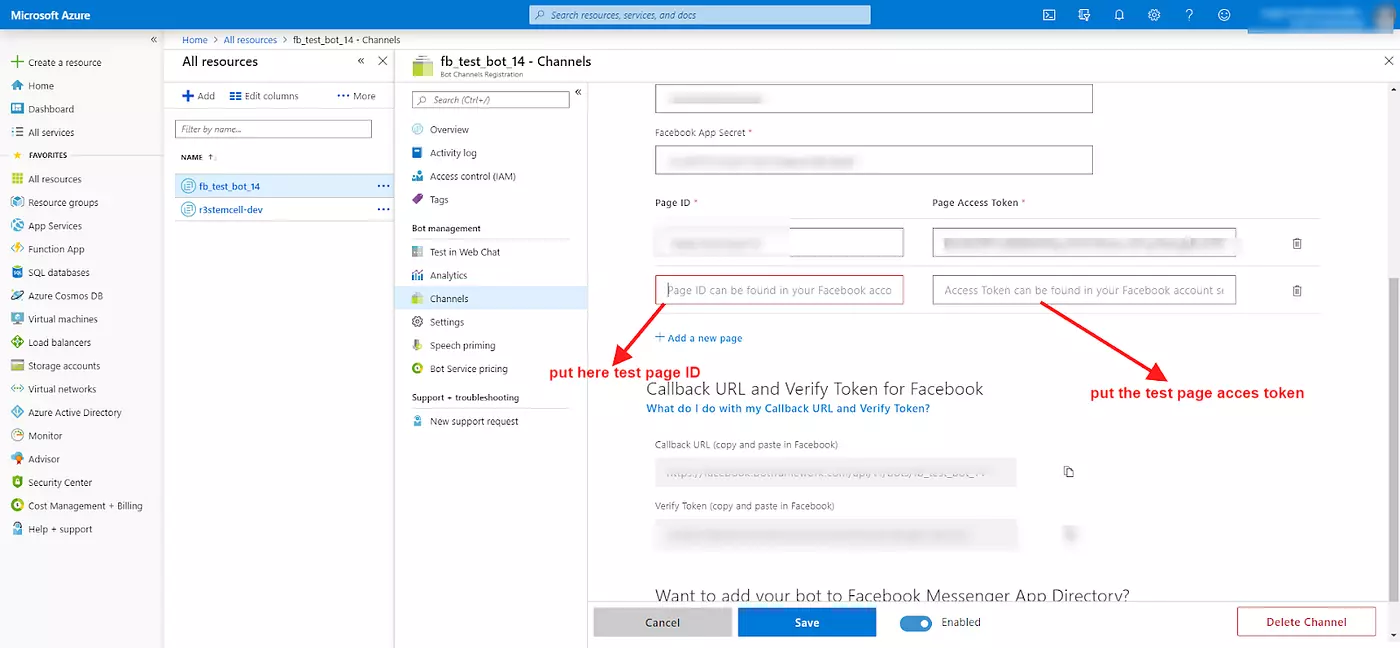
Now you need to connect your app with a service provider. As we are using Microsoft Azure, I’m going to explain to you how you can connect your app with Microsoft Azure. You can use any service provider with Page id and Access Token.
Got to the https://portal.azure.com and log in. Then select your bot and perform the steps according to given Screenshots:
Now when you submit you need to give the test user username and password Facebook team will test your Test page.
9. Add Submission Details
Go to Left side menu> Messenger > Settings and scroll down a little. Now in the ‘Current Submission’ section, click the ‘Add Details’ button for each requested permission.
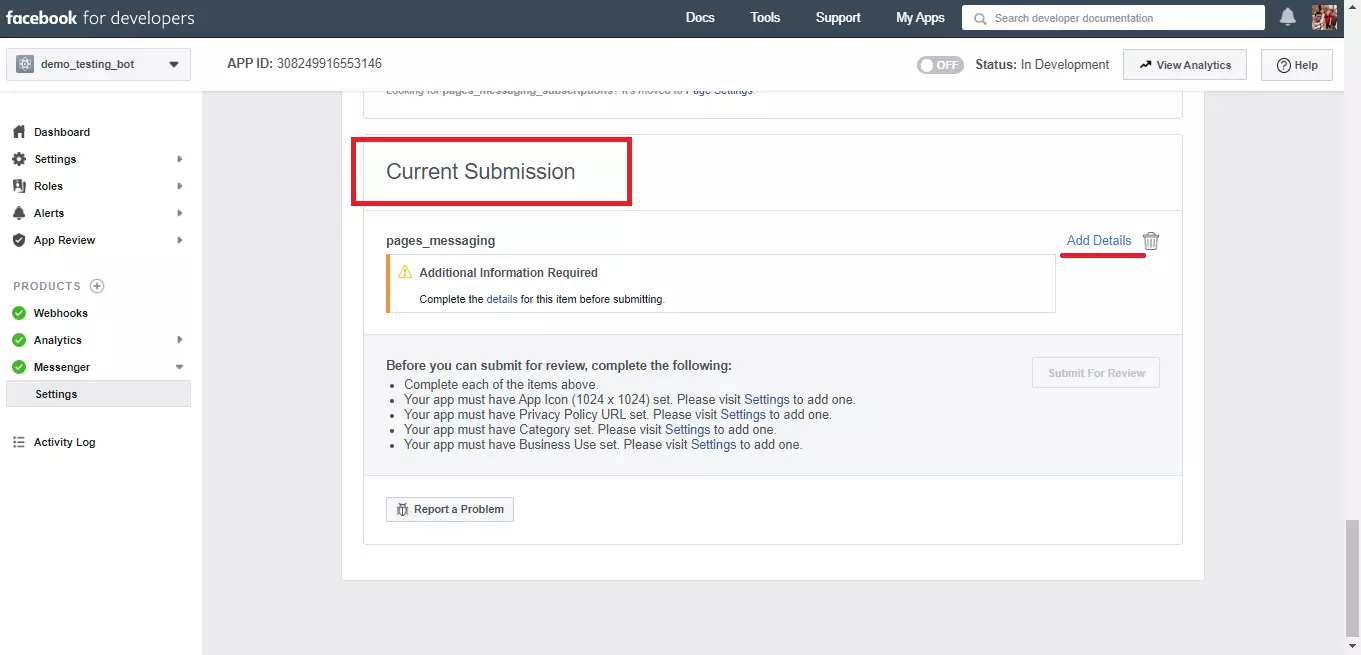
- When you click on “Add Details” For each permission, a dialog will be displayed with a form for supplying additional information.
- Complete each form to provide the required information to the Facebook team.
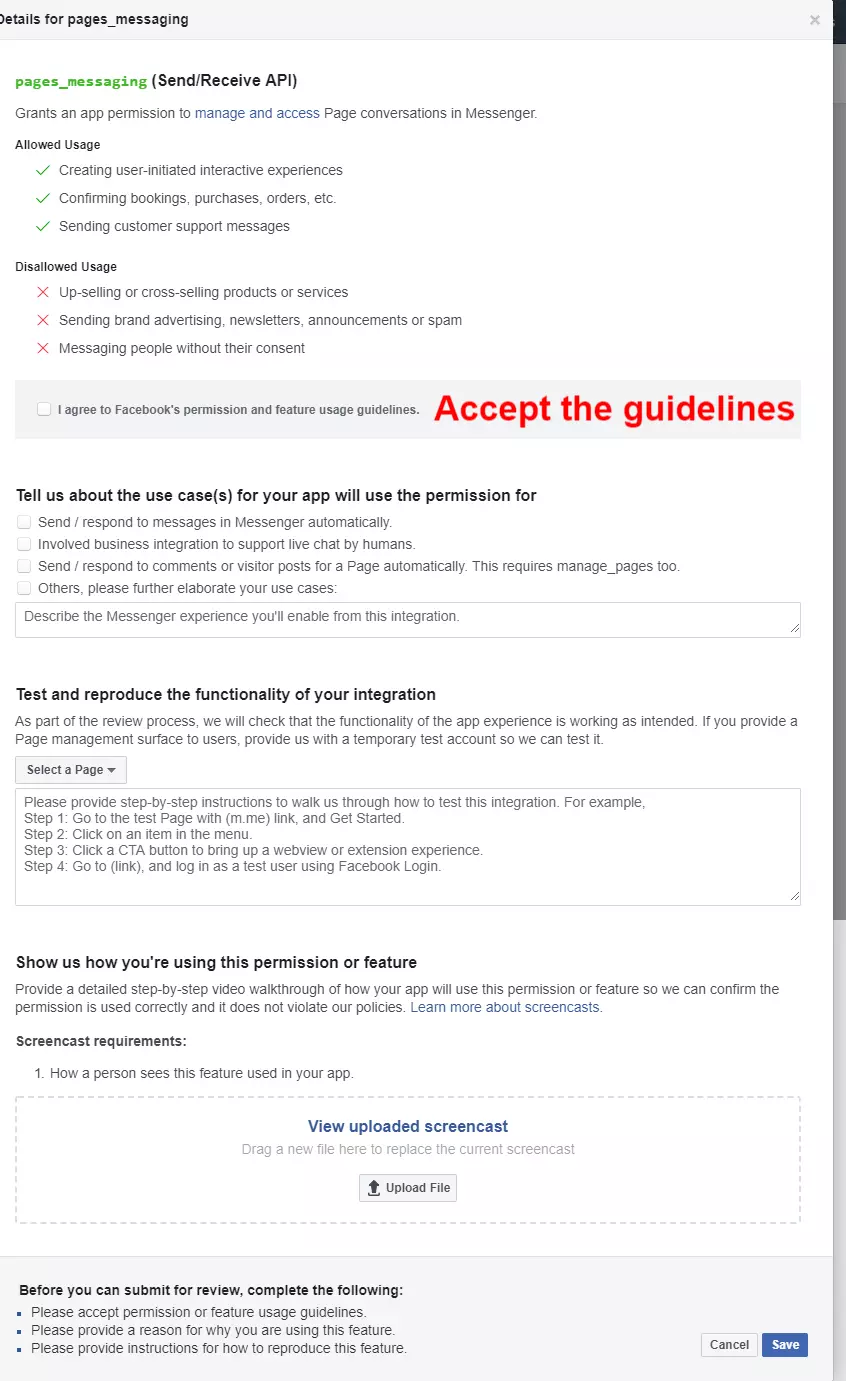
If you are not able to understand what each checkbox means, and which checkbox you need to “check”, Facebook has an explanation for that:
1. Send/respond to messages in Messenger automatically.
- All responses from the bot are programmed ahead of time. The bot doesn’t require any manual intervention in order to function. For example, a bot that provides news and weather updates. After setting up the bot, the developer doesn’t need to respond to each message.
2. Involved business integration to support live chat by humans.
- Responses from the bot are provided by live representatives. For example, a bot for a business that communicates with its customers through third-party CRM software. People who message the bot won’t get a response until someone from the business responds manually.
3. Send/respond to comments or visitor posts for a Page automatically
- When the page visitor comments on the page post at that time we send the response to the user Example:- there is one post some visitors are a comment on this post so we are sent on default messages to the visitor
4. Others, please further elaborate your use cases:
- When we use the broadcast or send API so we can check this option
Now you can see the next option “Test and reproduce the functionality of your integration”. Here you need to select a page, And below you can see TextArea. You need to write the “STEPS” of the bot, which shows all the functionality you have covered in your bot. In brief in this text area, you will write the steps of accessing your bot, and you need to include each step which shows some functionality you have created in your bot.
- In the next step, you need to upload a video file that must include all the functionality you have listed. The video must show accessing all the features which are listed so Facebook can confirm the permission is used correctly and it does not violate their policies.
- Then click “Save”.
- When you will save that page, you will find the “Submit for Review” button. Click the ‘Submit for Review’ button to submit your bot. The name of the person who submitted the bot and the time it was submitted will be displayed.
- After your bot is submitted, our review team will send messages to your bot to test for responsiveness, functionality, and policy compliance. Please note that our team may message/use your bot several times over the course of multiple days.
10. Provide Verification Information and Documents
- Once your bot has been reviewed for responsiveness, functionality, and policy compliance, you will receive a message asking you to complete business verification or individual verification in the ‘Alerts’ tab of the app console.
Business Verification
- Now if you don’t have a business account on Facebook, Go to — https://business.facebook.com and create a new Facebook business account.
- Fill all details like name, address taxId, phone Number, Ect.
- If you already have a business account, As well as after creating a new business account move to this step 👇Again go to https://business.facebook.com and now you will find this page:
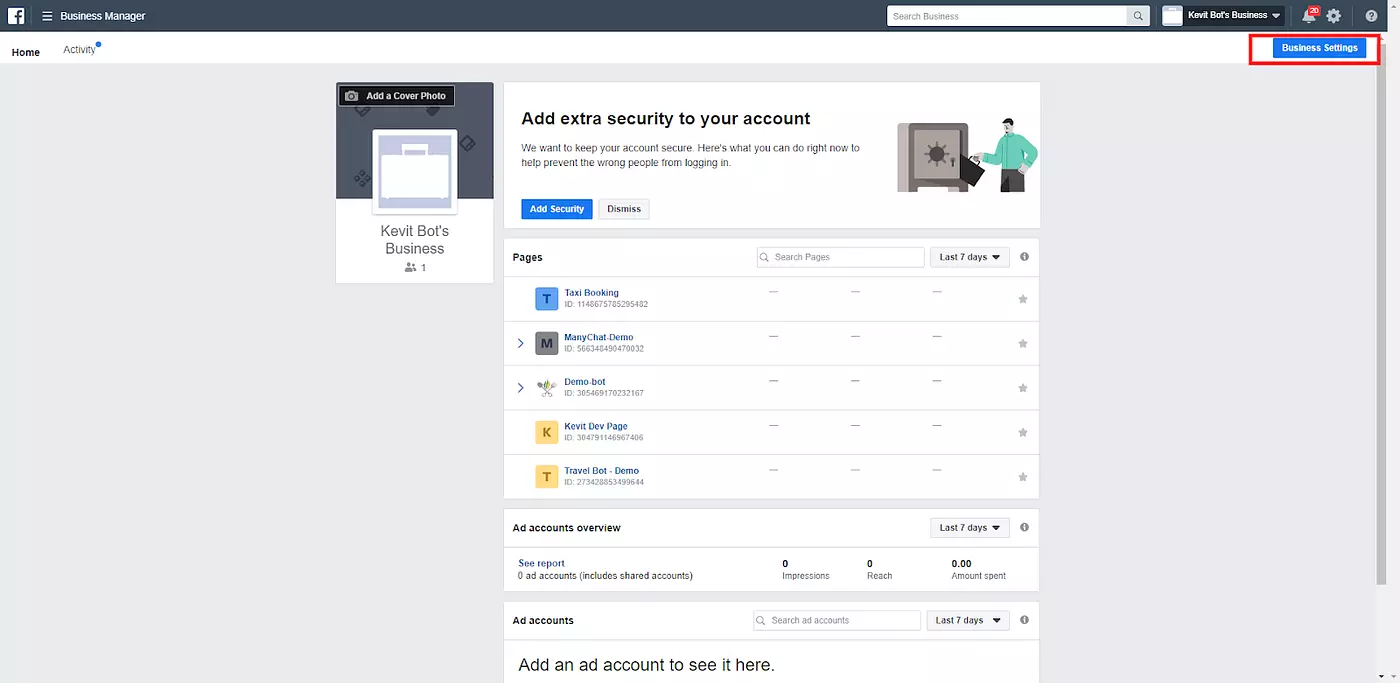
Here go to Business Settings, You will land on this page:
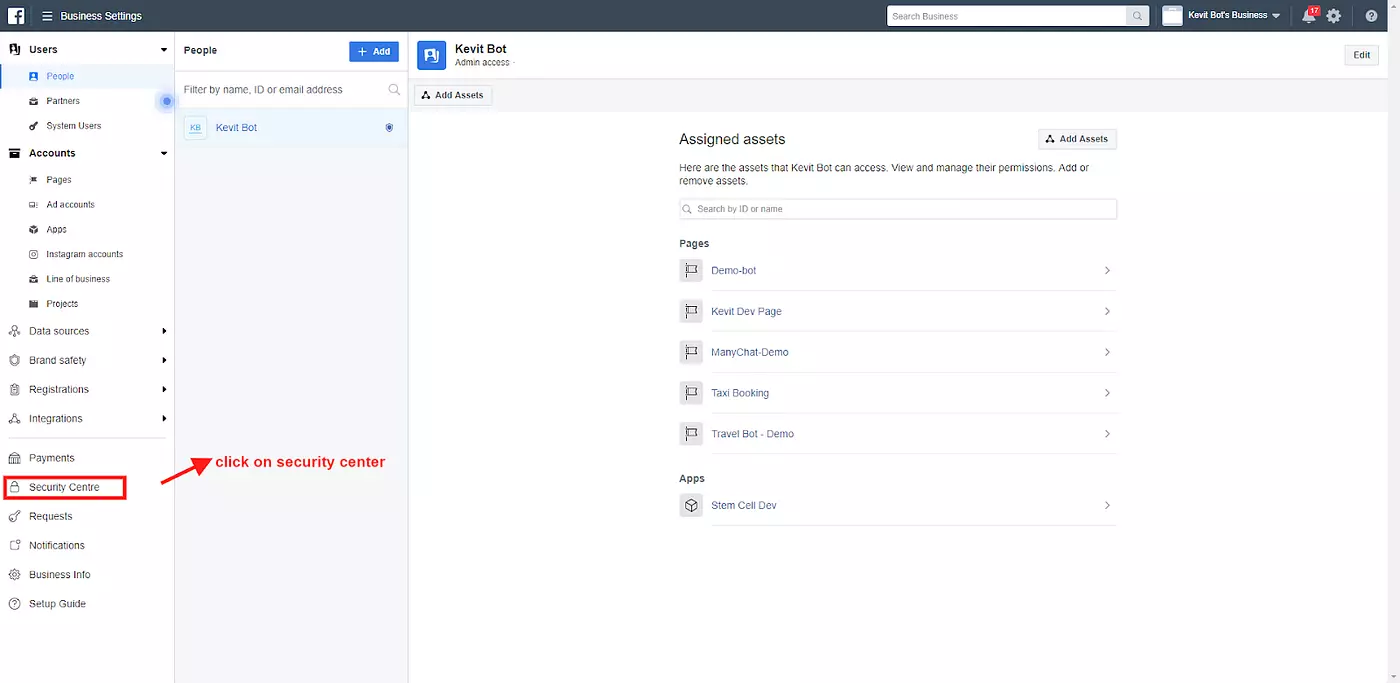
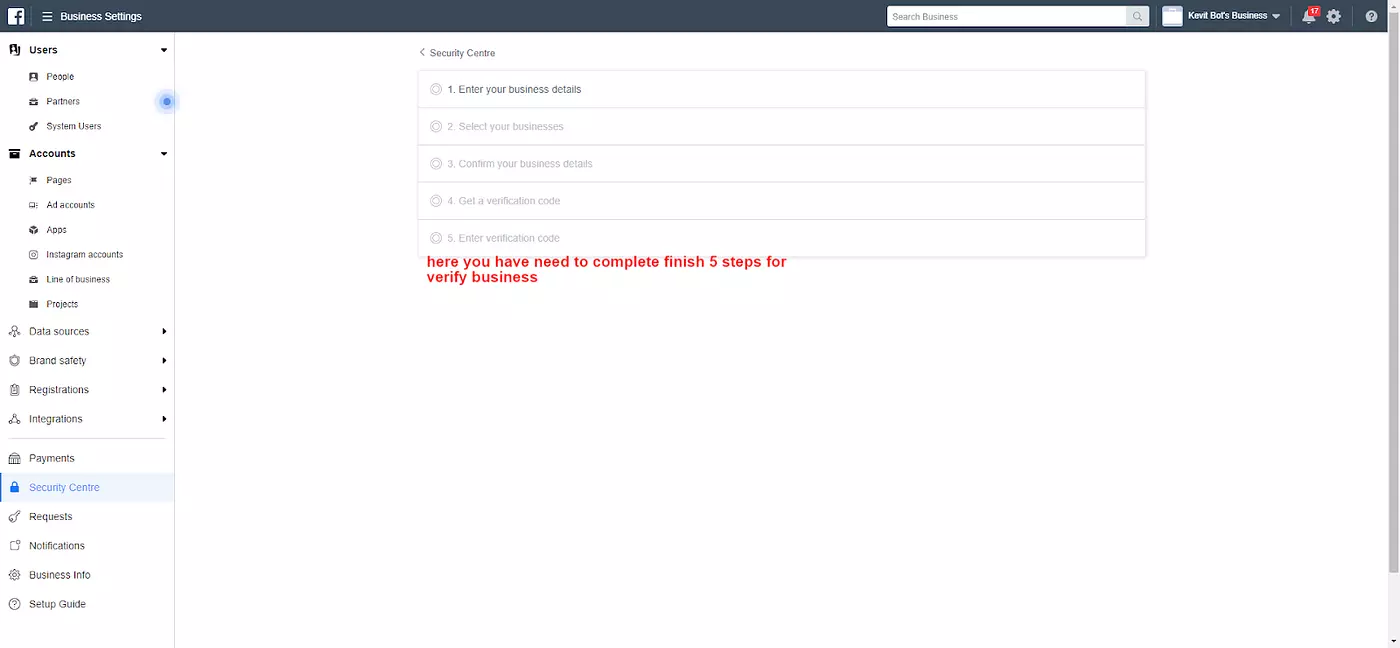
Find the Verification section and below Business verification, click Start Verification.
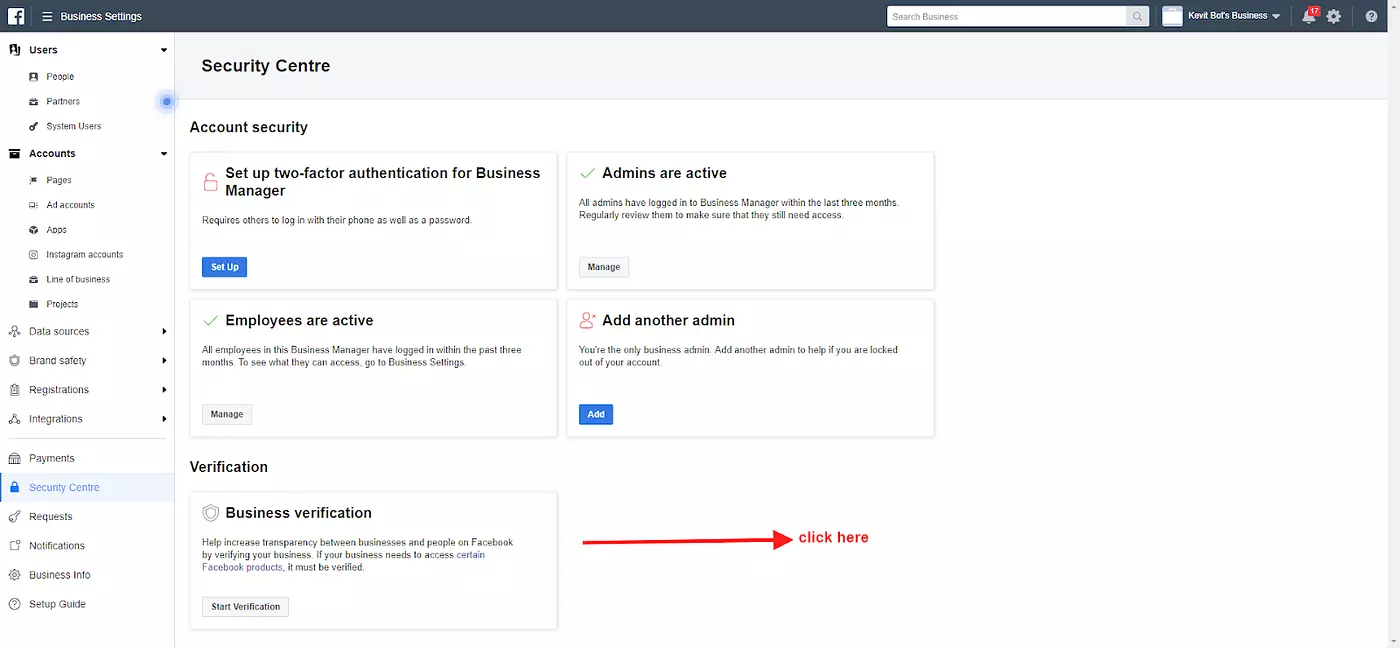
Enter your business details and click Next. And follow the below steps 👇

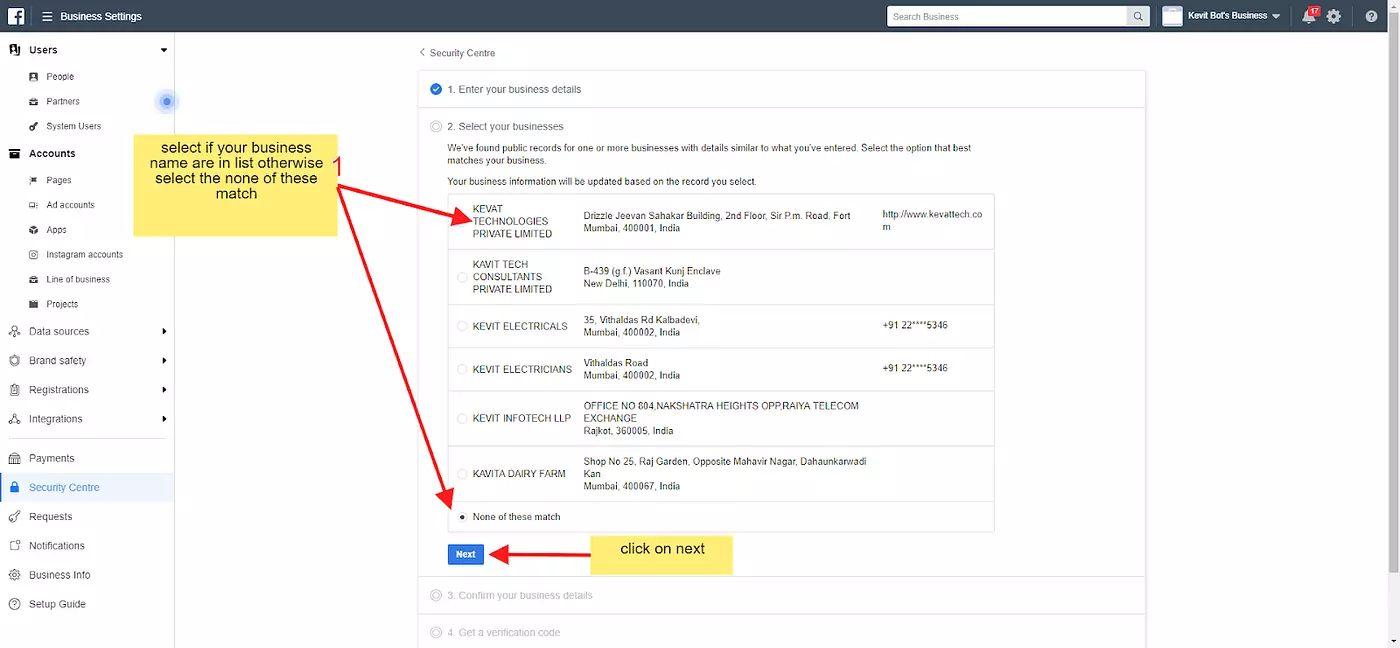
- Select the correct business from the list of suggestions or select “None of these match” if your business is not displayed.
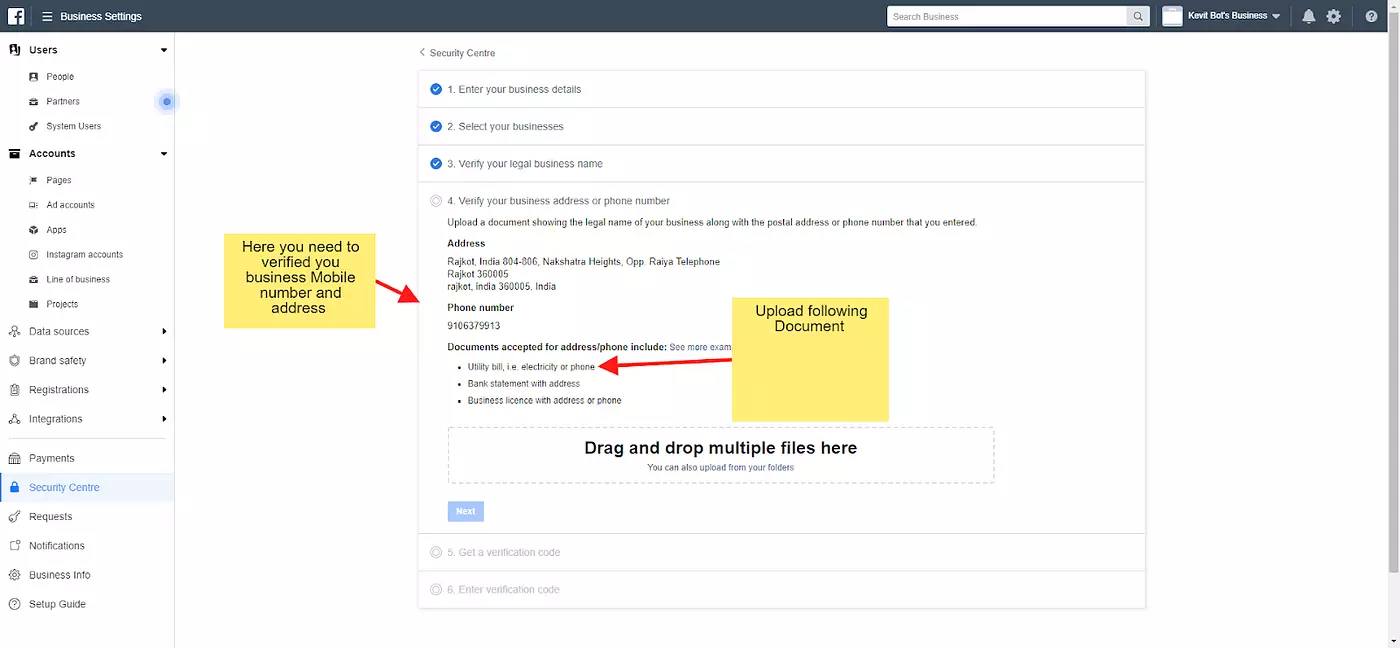
- Follow the prompts on your screen to confirm your business details. If you select None of these, you’ll need to verify by submitting additional documentation.
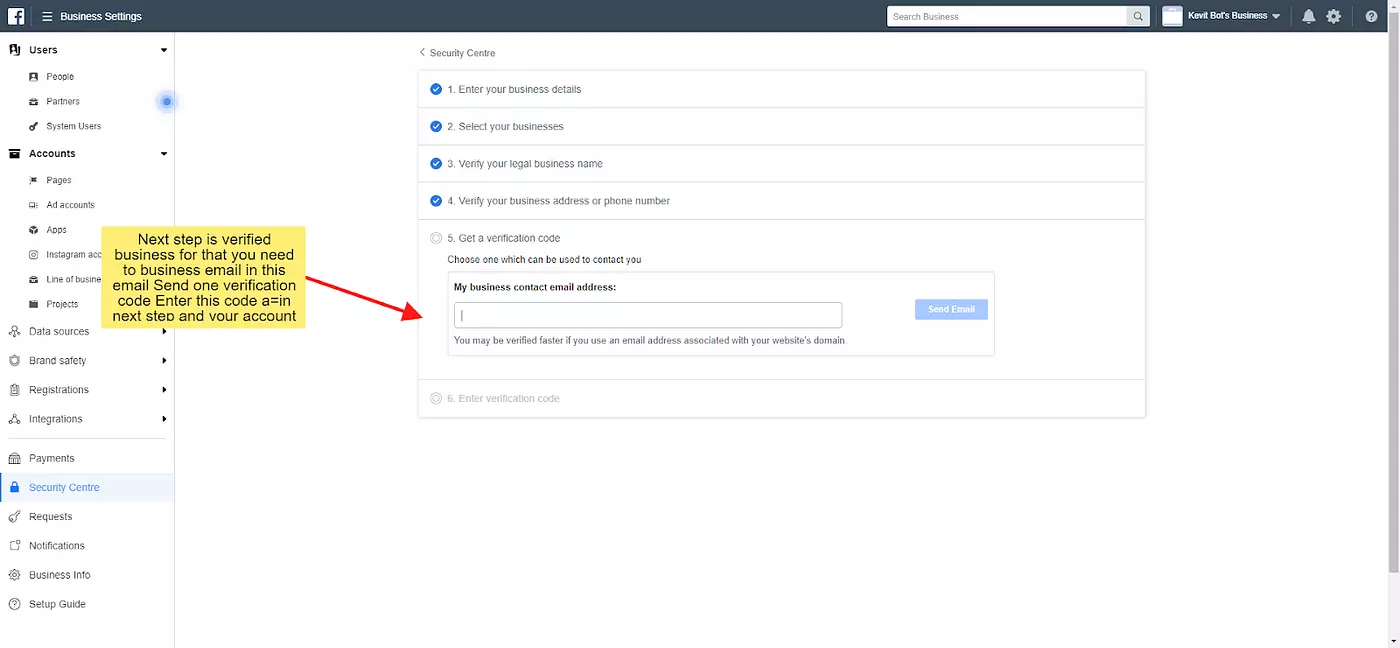
- Decide how you’d like to receive your verification code and choose “Call Me Now” or “Send Email”. Depending on your location, you may not have the option for verification via phone. You’ll need to use the email option.
- Enter your verification code.
- Once you receive confirmation that your business is verified, you’re ready to go!
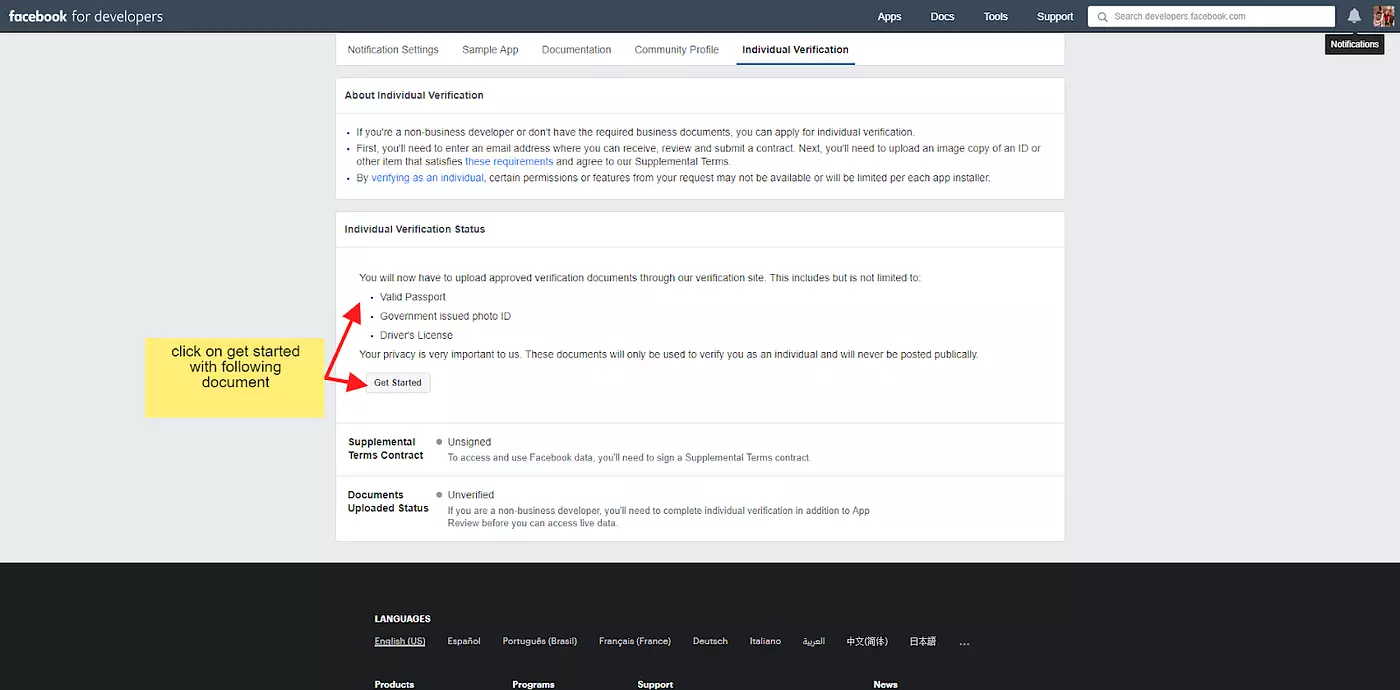
Individual Verification
- If you’re a non-business developer or don’t have the required business documents, you can apply for individual verification.
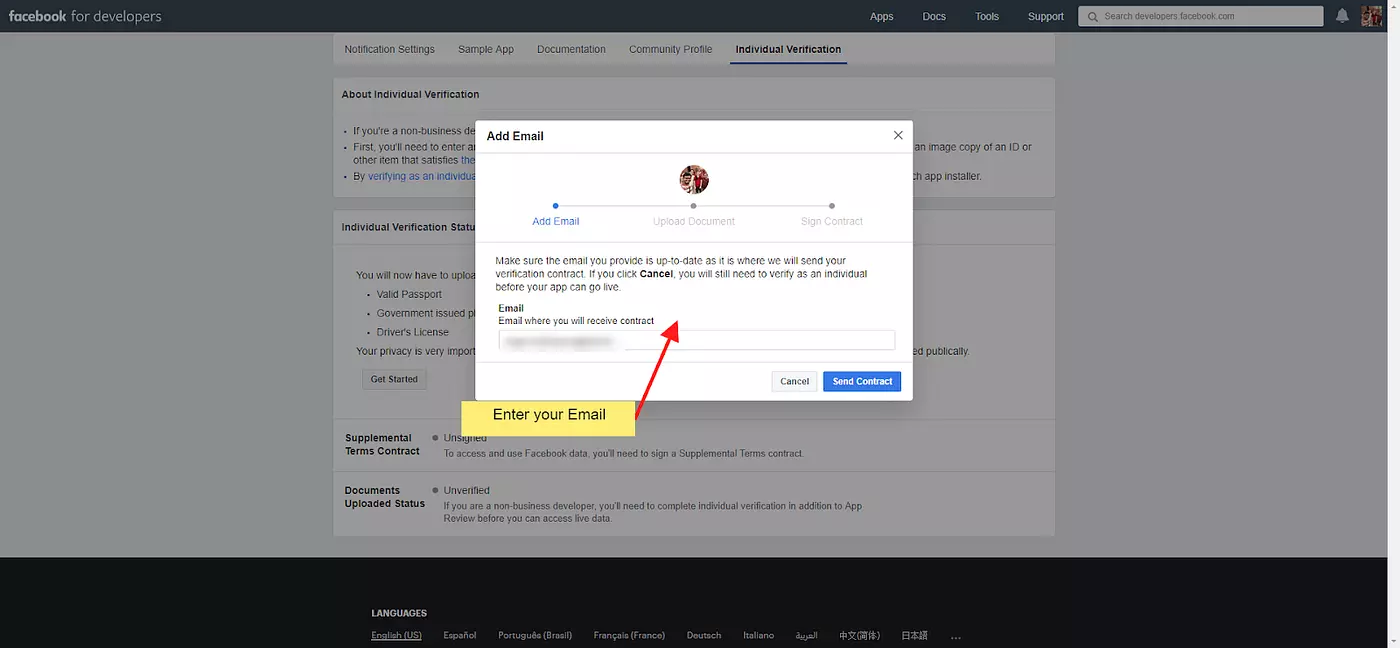
- First, you’ll need to enter an email address where you can receive, review and submit a contract. Next, you’ll need to upload an image copy of an ID or other items that satisfies these requirements and agree to our Supplemental Terms.
- By verifying as an individual, certain permissions or features from your request may not be available or will be limited per each app installer.
- https://developers.facebook.com/settings/developer/indie-verification/
- Go to the link and follow the steps given below:
After that, you received a pdf of agreement:
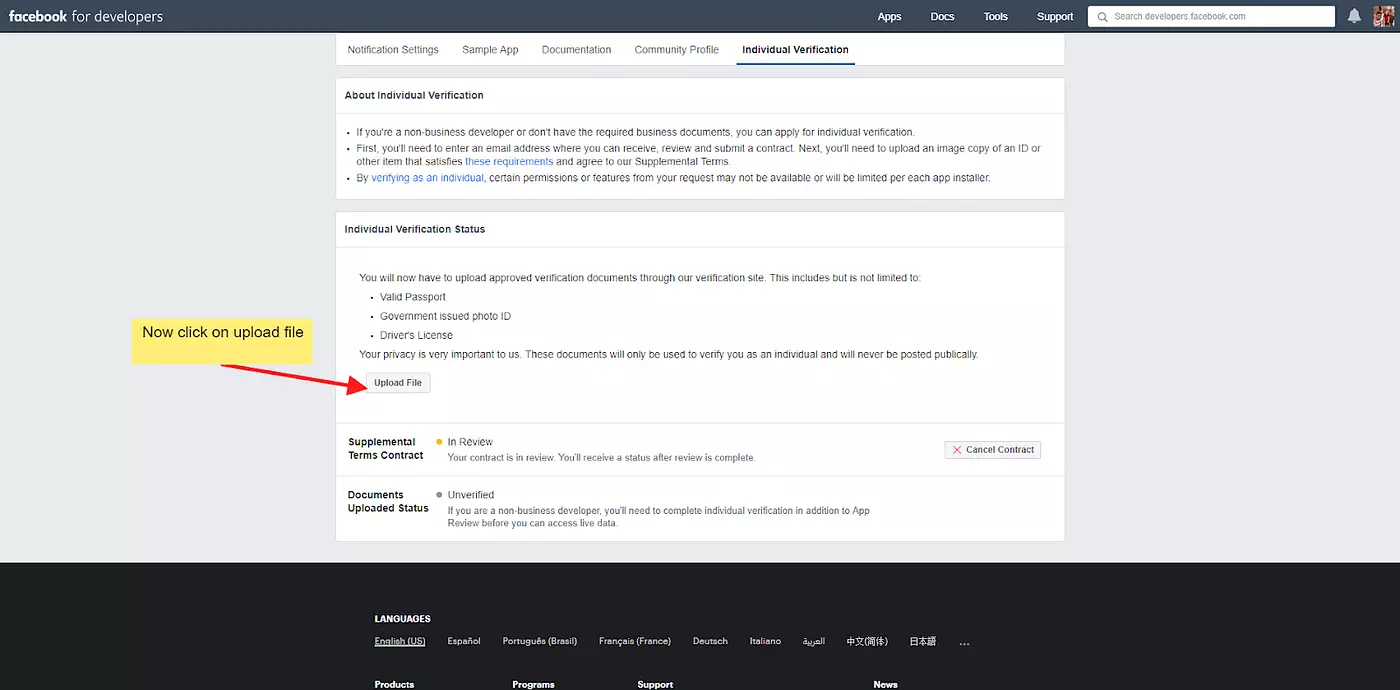
- After you upload this, you will get a verified account.
11. Accept Supplemental Terms and Sign Tech Provider Agreement
According to Facebook:
After your business information and verification documents are submitted, you will receive an email from the Facebook legal team with links to the following:
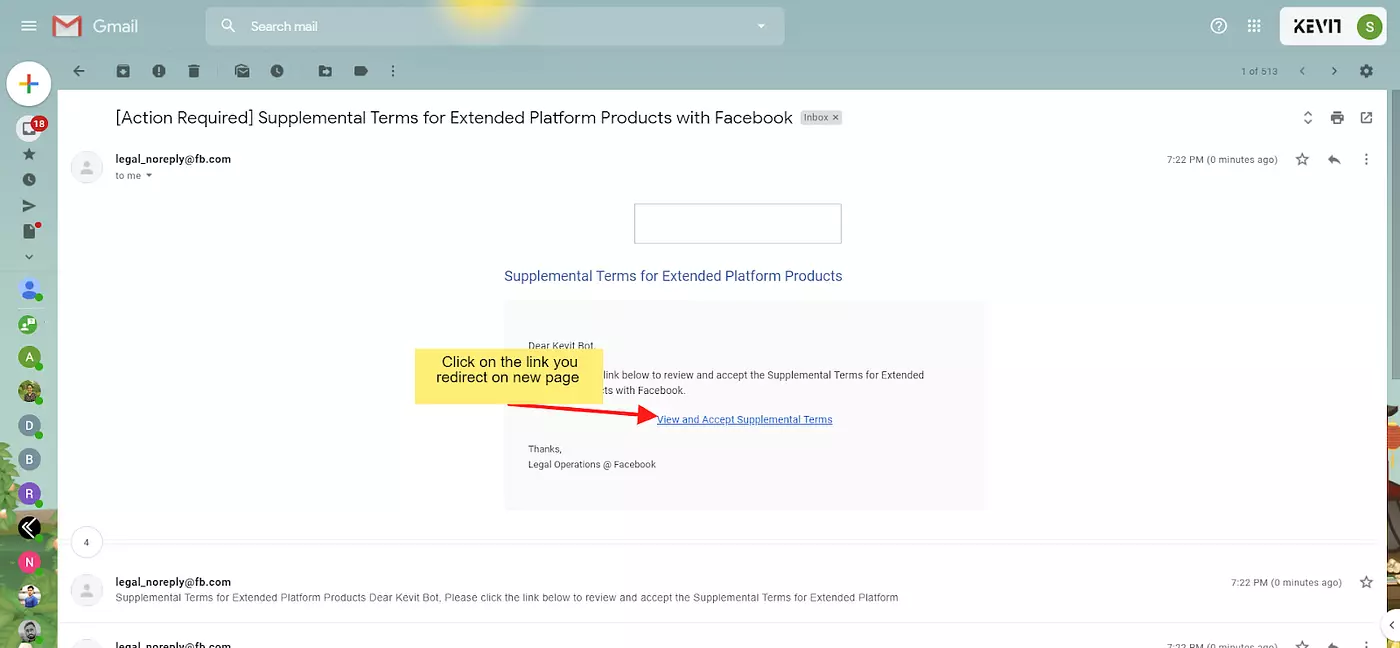
- Supplemental terms: These are additional terms that all app developers must accept to use extended Facebook Platform products, including the Messenger Platform.
The supplemental terms will be sent to you in an email with the subject line, “[Action Required] Supplemental Terms for Extended Platform Products with Facebook”. - Tech Provider Agreement: An additional contract that must be signed by a signatory of the business. This is only required for apps whose ‘business use’ in their app settings is set to ‘Provide services to other businesses’.
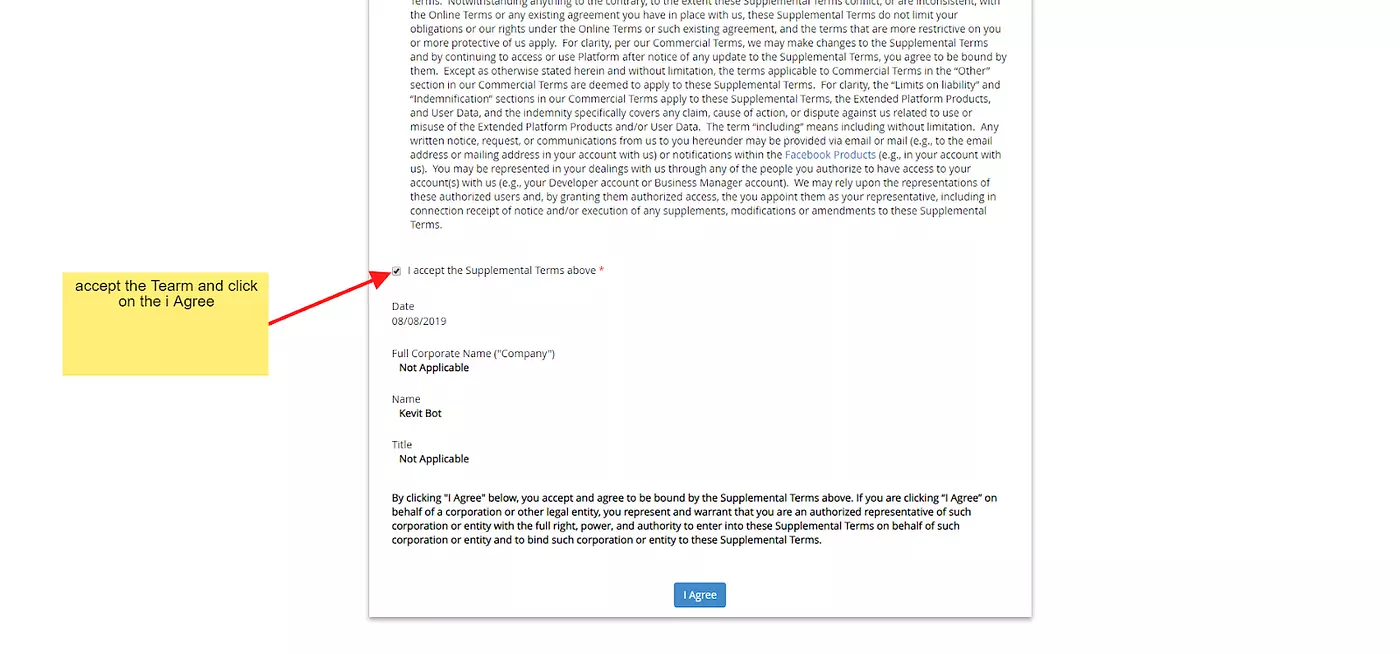
The Tech Provider Agreement will be sent to you in an email with the subject line, “Please sign Technology Provider Amendment” - You must read and accept the supplemental terms, as well as read and sign the Tech Provider Agreement (if applicable) as part of the business verification process.
- If you do not receive the supplemental terms and, if applicable, the Tech Provider Agreement, please check your spam folder.

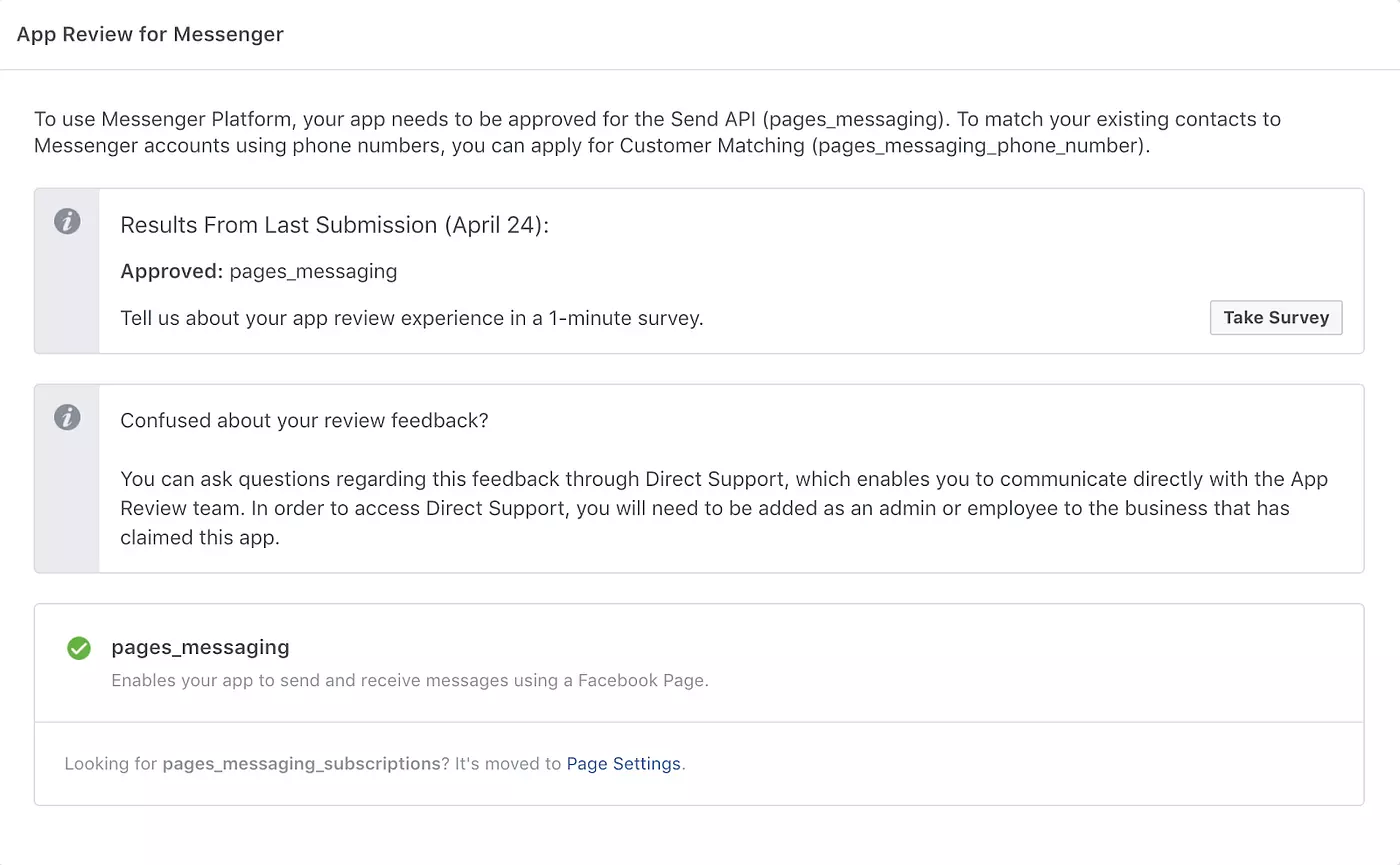
12. Watch for Approval Alerts
- Once your app has passed review and business verification, it will be approved!
- Once your bot is approved, the Facebook team will send you a Facebook notification. A green check-mark will appear next to the pages_messaging permission under ‘App Review for Messenger’.
- What to do if your bot is not approved.
- If your bot is not approved, click the ‘Add to Submission’ button next to ‘pages_messaging’ to see the feedback from our review team.
- If you have any questions, you can communicate directly with the review team to clarify how you can update your bot by using the ‘Ask a Question’ button below the rejection notice.
So, this was a complete guidance about how to Publish your bot on Facebook or How to get your Facebook App reviewed? We tried to cover each and every element in this guidance. I hope this will be useful to you. So next time if you need to publish your own bot, you don’t have to go through 5–6 different articles and guidelines.
We are working with Facebook Messenger bot since it was introduced for the first time. Kevit.io has earned a name in Chatbot development within a short period of time. For more help, and solutions like this you can visit us at Kevit.io or you can get in touch with us at coffee@kevit.io.